
Monday, December 9, 2013
New website!
Hey Elmwood Eats readers! Exciting news, I have a new web site that combines my photography portfolio and my blog. Please visit caseysasser.com to see more and to continue reading my blog.

Saturday, November 30, 2013
Pear-Cranberry Crumble
Yesterday, I was going through a pile of old stuff that had been sitting in a closet at my parents' house. Included in the pile were all my old journals from middle school and high school, which were fascinating and hilarious to read through. The funny part was how angsty I was all the time, about school, family, ballet, college applications, relationships (namely a certain boy named Gabe)...it was all SO dramatic and I was constantly doubting myself and my abilities. It was really refreshing to look back on those experiences and realize how well everything turned out: I got into a great college, I grew so much during the years I spent dancing, and that awkward high school relationship with Gabe was the best thing that ever happened to me. So I guess this is a long way of me saying that this year, I'm thankful to have perspective. It's a perfect reminder to just take things as they come, appreciate the good things in life and learn from the hard things, and remember that everything happens for a reason.
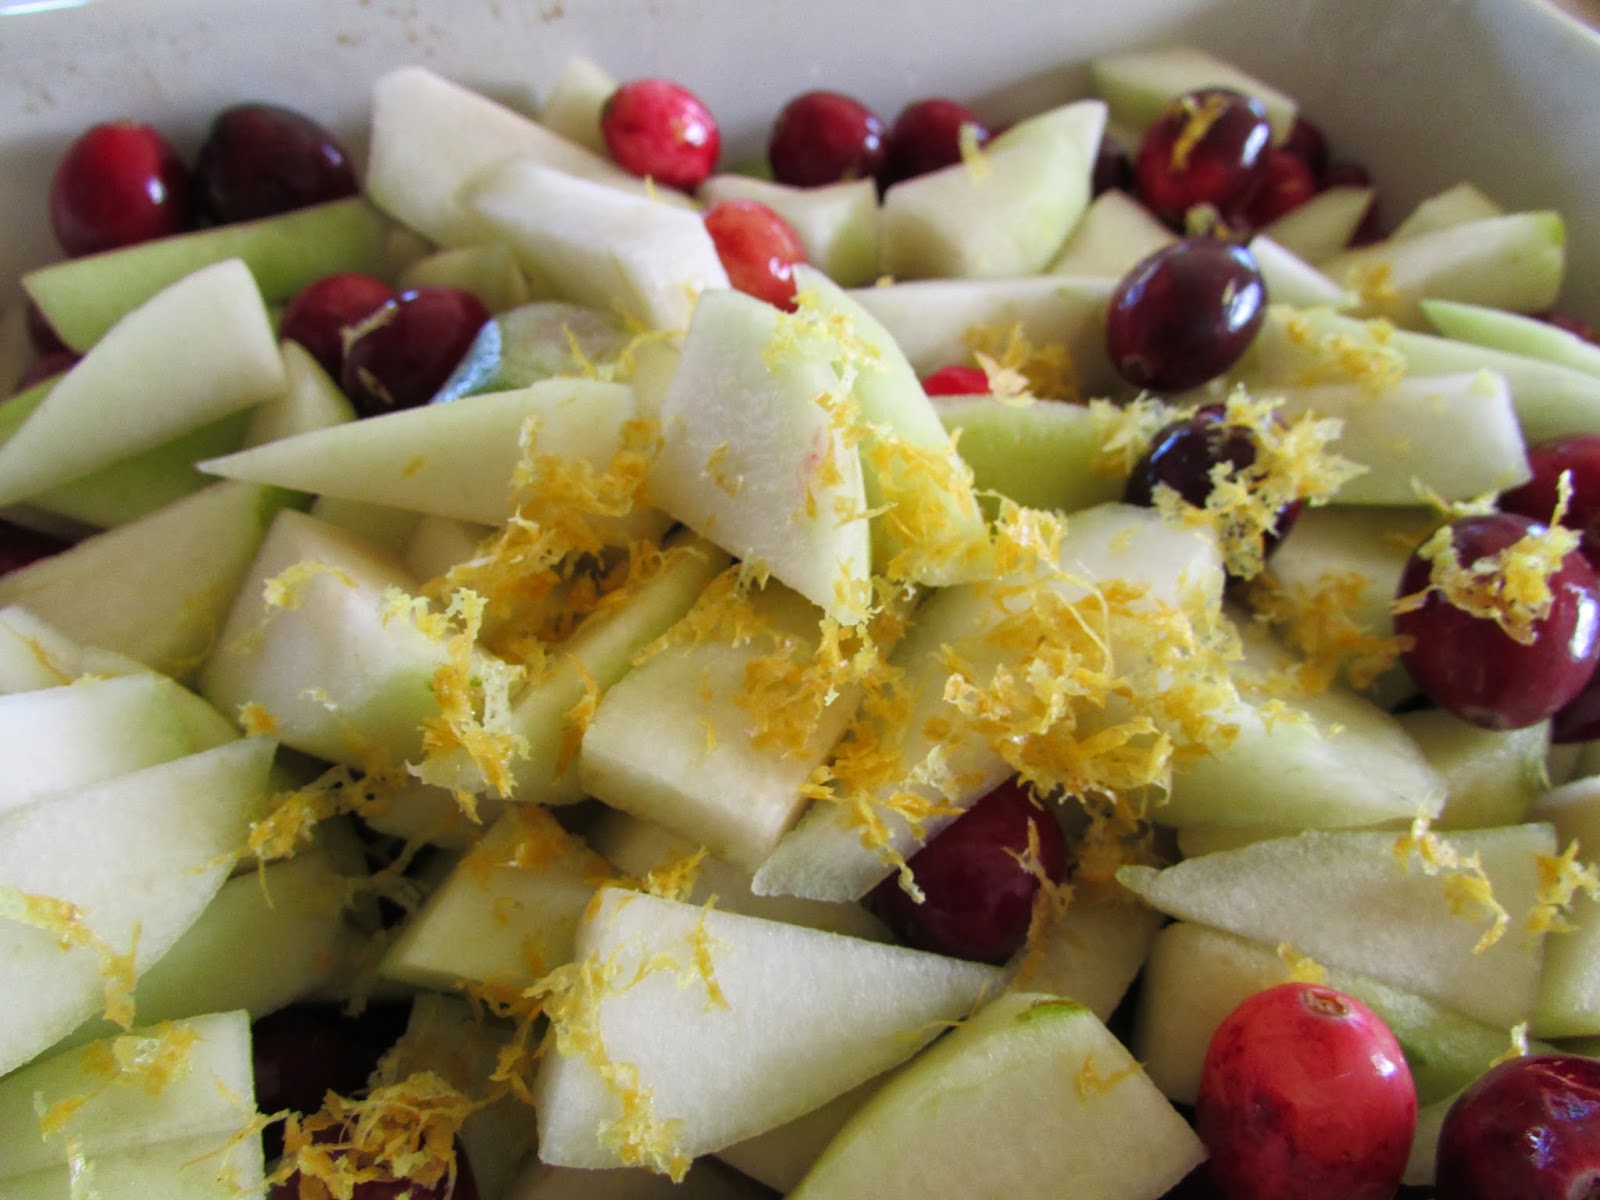
Speaking of being thankful, this is the dessert I made for our second Thanksgiving. It's slightly tart and perfectly refreshing (especially after a huge meal), and the gingersnap crumble on top gives it a little kick. It's a gorgeous, festive dessert for any holiday meal!
Pear-Cranberry Crumble (recipe adapted a tiny bit from Smitten Kitchen...man do I love her!)
Crumble topping:
1 cup all-purpose flour
1/4 cup granulated sugar
3 tablespoons packed brown sugar
1 cup gingersnap crumbs (about 16 small cookies, pulsed in a food processor - I used Trader Joe's Triple Ginger Snaps)
1/8 teaspoon ground ginger
1/4 teaspoon cinnamon
1/8 teaspoon salt
1/2 cup unsalted butter (1 stick) melted and cooled
Filling:
2 pounds (4-5) large Bartlett or Anjou pears, peeled, cored, and sliced about 1/4 inch thick
1 1/2 cups fresh cranberries
1 tablespoon lemon juice
1 tablespoon lemon zest
1/2 teaspoon vanilla extract
1/2 cup granulated sugar
2 tablespoons cornstarch
Preheat the oven to 350 degrees. Stir together the flour, both types of sugar, gingersnap crumbs, ginger, cinnamon, and salt. Then pour in the melted butter and stir until large crumbs form.

In a 1 1/2 to 2 quart baking dish, mix the pears, cranberries, lemon zest and juice, and vanilla. In a separate bowl, stir together the sugar and cornstarch, then add it to the fruit mixture and stir until it's evenly distributed.
Sprinkle the gingersnap crumble evenly over the top, and bake for about 45 minutes or until the topping is slightly darker and the juices are bubbling through.

I would recommend serving it while it's still a little warm, with some vanilla ice cream or whipped cream on top.

Wednesday, November 20, 2013
Life Lately
Two non-recipe posts in a row - yikes! That's kind of how it's been recently though. We were out of town visiting family in Carmel Valley, then the following weekend we moved, and last weekend we needed some time to recover and do nothing.
Luckily I do have some photos to tide you over until the next recipe post! I'm making desserts for all three (yes, three) Thanksgiving celebrations we're attending this year, including a classic apple pie, a pear-cranberry crisp with a gingersnap topping, and an attempt at a gluten-free dessert for my mother-in-law. Stay tuned...


We took a drive down to Big Sur during our time in Carmel...how have I not spent more time there?! It was a gorgeous fall day that made me fall in love with California even more.
Not long after that relaxing weekend, we moved. I can't remember the last time I was that exhausted! We are finally settling into the new place and are amazed by how spacious it is.


Poppy likes it too, since she has much more room to run around and chase imaginary things. Also more closet space to hide in.

Thursday, November 7, 2013
In Transit
Gabe and I are moving this weekend, just a few miles away, to a much bigger place with a yard and multiple closets and all kinds of other awesome stuff. It's a little bittersweet since we've created such great memories at our soon-to-be old place, so I felt a little tribute was in order.
This apartment was our first place together, fresh out of college, and meant the world to us as our first home together. After more than four years of long distance during college, being able to finally move in together was a huge, exciting step for us. When we moved in, Gabe didn't have a job yet, so he stayed home and put together Ikea furniture all day. After a few weeks we finally bought a couch but the space was so small that all we could fit was one half of a sectional.


Around Valentine's Day last year, we went to a local animal shelter "just to see what was there" and ended up becoming the parents of a sassy orange cat who has clawed her way into our hearts.

We brewed beer together, cooked meals together, and I started a blog. We learned each other's habits and quirks and settled into a routine.

Last May, I helped Gabe slowly climb the stairs as he returned home after an eight day stay in the hospital. A few short months later, I bounded up the stairs alone, my heart racing, as an epic treasure hunt ended in Gabe's proposal in our living room. Poppy participated, of course.

Amy came to visit and we watched the Giants win the World Series!

We had our first Christmas together and picked out a tree that barely fit in the living room...but it was perfect nonetheless.


And then we returned from our honeymoon, back to real life, and ready to seek out a new place to turn into our home.

Thanks for the memories, Stuart Street. I can't wait to see what the next place brings!
Sunday, October 27, 2013
White Bean, Kale, and Potato Soup
As I type this post at the table next to my kitchen window, it's grey and windy outside, the 49ers game is on TV, and I'm sipping hot tea...yep, fall is here! And you know what that means: soup weather! In my opinion, there is nothing better than a steaming bowl of soup on a chilly evening. This white bean, kale, and potato soup is hearty, comforting, and easy to make.
White Bean, Kale, and Potato Soup (serves 6-8):
1 cup each chopped celery, white onion, and carrot
3 cloves garlic, minced
3 tablespoons olive oil
2 teaspoons each salt and pepper
3 spicy Italian sausages with casing removed (optional)
8 cups chicken or vegetable stock
1 pound red potatoes, cubed
2 16-ounce cans of cannellini beans, rinsed and drained
1 bunch kale, chopped (about 4-5 large handfuls)

In a large heavy bottomed-pot over medium-high heat, saute the carrots, onion, and celery in three tablespoons of olive oil until soft and translucent, about 7 minutes. Add the salt, pepper, garlic, and sausage (if using) and saute until the sausage is cooked through, breaking it up into small pieces as you go.

Pour in the chicken or vegetable stock and turn up the heat to high, bringing the soup to a boil. Then add the potatoes and keep boiling for about ten minutes or until the potatoes are cooked through but not mushy. Turn the heat back down to medium and stir in the white beans and kale, letting the soup simmer for another ten minutes or so.

Serve with a little grated cheese on top (Parmesan or something similar) and some warm, crusty bread for dipping. Oh, and red wine pairs very nicely too!

Sunday, September 29, 2013
Grandma Betty's Chocolate Peanut Butter Buckeyes
I hope you'll indulge me with just one more wedding-related post. As I mentioned a few times, we decided to DIY our wedding desserts for a few reasons. First, neither of us really likes cake that much, and wedding cakes are expensive! It didn't seem worth it to go the traditional route if neither of us would enjoy it. Second, it was challenging to find a local bakery who could provide what we wanted - it seemed like there were several places that did scones and muffins rather than actual desserts.
When we first started wedding planning, I briefly entertained the idea of doing our own desserts, but quickly shot myself down because I figured it would be too stressful. Well, I'm happy to report that it was a huge success! We were very grateful for the help of several family members who contributed to the dessert buffet, and it was fun for our guests to see who made what. I was walking around during dessert and was SO happy to see people who piled their plates with all kinds of treats.
Here's a small sampling of the desserts (all photos by Christina Richards).


One of the biggest hits of the dessert table was Gabe's grandma Betty's buckeyes. Before I met Gabe, I had never heard of buckeyes before...16 whole years of my life had been devoid of these incredible treats. They're little bite-size bombs of peanut butter and chocolate, made to look like the nuts from the Buckeye tree (the Ohio state tree, I gather they're more of an East Coas thing). In other words, they're like a homemade Reese's Peanut Butter cup but bigger and maybe even more delicious (how is that even possible!?).

(The beautiful buckeyes)
Grandma Betty was kind enough to share the recipe, and I figured it was only fair to pass it along. Here it is, in her words.
1 stick margarine or butter at room temperature
1 pound powdered sugar
2 cups extra chunky Jif peanut butter (note: don't try and substitute natural peanut butter, you need the shelf-stable kind to make the mixture bind properly)
3 cups rice krispies
12 ounces chocolate chips
2/3 bar grated paraffin wax
Blend together with a spoon the butter, peanut butter, and powdered sugar. Add rice krispies, and with your hands, squeeze into walnut sized balls making about 50 (this mixture is dry but just keep squeezing and it will work!).
Place balls on a wax paper lined cookie sheet as you form them.Then melt the chocolate chips with the wax* in the top of a double boiler over hot (not boiling) water. Dunk balls in the chocolate using two forks, let drain on the forks over the chocolate for a few seconds, and then place on wax paper lined cookie sheets. Do not have balls touching on the cookie sheets until the chocolate sets.
If they don’t disappear immediately, they can be kept in the fridge for a while in a tightly closed container or in the freezer.
*A note from Betty on the paraffin wax: The wax helps thin the chocolate a bit also adds a lovely shine to the buckeyes. In over 35 years making these, no one has gotten the least bit sick over eating the wax—they don’t even taste it! Trust me!
Monday, September 16, 2013
I'm baaack!
Ok, for real this time. I thought I could keep up with posting even during the final two months of wedding planning but clearly I was wrong! I'm happy to report that all the hard work was worth it.


Both photos by Christina Richards Photography
Anyway, now that I have some more free time on my hands, I have serious intentions of posting new recipes and other tidbits more often. Last weekend, I jazzed up my old favorite avocado mango salsa recipe and will share that soon. And I can't wait to show you all some photos of how the potluck dessert buffet at the wedding turned out; it was better than I ever could have imagined! The photo above is of one of the many delicious pies we had.
Friday, June 21, 2013
Apricot Cherry Pie
Well that was quite the unintentional blog hiatus! Life just kind of took over for a while, but I'm back now with a delicious summer pie recipe for you.
I made this Apricot Cherry Pie last weekend as a special birthday treat for my Great Aunt. I won't say how old she is but it was a special milestone birthday! This pie takes two of my absolute favorite fruits and combines them into a luscious, sweet, slightly tart dessert. In fact, it was so good that I'm adding it to the list for my wedding potluck dessert spread. Yep, that's right...we struck out TWICE on potential bakers/bakeries, so we said screw it, we'll do it ourselves! Kind of crazy but kind of awesome (hopefully). I'll be making a few pies myself, and this will definitely be one of them.

Apricot Cherry Pie (recipe from Butter Love Bakeshop, but the crust is my go-to from Smitten Kitchen)
For the crust:
2 1/2 cups flour
1 tablespoon sugar
1 teaspoon salt
2 sticks (1 cup) unsalted butter, diced, very cold
1 cup ice water
For the filling:
2 1/2 pounds apricots
1/2 cup cherries
3/4 cup white sugar
1/4 cup cornstarch
1/4 teaspoon almond extract (I didn't have any so didn't add this, I'm sure it would be delicious though!)
1/4 teaspoon nutmeg
To make the crust, combine the flour, sugar, and salt in a large bowl. Cut in the butter using a pastry cutter or your hands. I've said it before here (my first blog post, aw!) and here but the key to flaky pie crust is to keep the butter very cold and as you cut it in to the dry ingredients, make sure not to over-mix - you want pea-size clumps of butter in your dough.
Slowly drizzle about 1/2 cup of the ice water over the dough, and use your hands to gently combine the mixture. If it feels too dry, add a little more water, just a little bit at a time. You want the dough to just come together, but not to feel wet and sticky.
Split the dough in half and shape each half into a disc, about 1/2 inch thick. Wrap each disc tightly in plastic wrap and refrigerate for at least 1-2 hours before rolling them out. The dough freezes well too, for up to a month!

For the filling, pit and quarter the apricots and place in a large bowl. Pit the cherries using a cherry pitter, or if you're like me and don't have one, use a knife to split them in half and remove the pit. I wish I had taken a photo of the cherry-pitting aftermath, it looked like someone had been seriously injured in my kitchen - there was red juice everywhere!
Mix the fruit with the sugar, cornstarch, almond extract, and nutmeg.

Roll out your crust and pour in the fruit mixture, then seal it up with the top crust. Make sure to cut a few vents in the top crust to let steam escape during baking. You can brush the top with egg wash or sprinkle it with sugar if you want...I didn't and it was still amazing!
Bake the pie at 400 degrees on a middle to lower oven rack for about 1 hour, until the filling is bubbling. I'd recommend putting a baking sheet under the pie to catch any drips. Also, if you notice the crust is golden on top but the filling isn't bubbling yet, just put a sheet of foil over the pie to prevent the crust from burning.


Ta da! My dad took this photo of the pie served with strawberry sorbet...so yummy!

I know you all missed Poppy...doesn't this picture make you want to take a nap?! Yeah, me too.
Tuesday, May 14, 2013
Banh Mi
I was first introduced to Banh Mi by this great Vietnamese food truck. This simple sandwich usually involves grilled meat, pickled vegetables, lots of cilantro, jalapeno slices, and spicy sauce, all served on a crisp, sweet baguette.When I was in LA for college, the food truck would park at the local brewery and we would get Banh Mi and Vietnamese Nachos to snack on with our beers. Conveniently, I now have a super authentic Vietnamese restaurant down the street from my office so I can satisfy my cravings anytime.
When I saw that one of my favorite food blogs had posted a Banh Mi recipe (and it seemed easy enough for a weeknight meal), I knew I had to try it...and I'm so glad I did! There are several different components to it which can seem intimidating, but it's really not hard to put together.

Banh Mi, serves 4 (Recipe adapted from Shutterbean)
For the marinade:
1/4 cup soy sauce
2 tablespoons fish sauce
Juice and zest of 1 lime
About 2 tablespoons ginger, peeled and minced
3 cloves garlic, minced
1 shallot, minced
2 tablespoons brown sugar
1/2 teaspoon black pepper
3/4 pound pork tenderloin, cut into 1/2 inch wide pieces
For the rest of the sandwich:
1 cup julienned carrots
1 cup julienned daikon
Juice of 1 lime
1 baguette (sweet rather than sourdough)
2 teaspoons Sriracha (or more to taste)
1/3 cup mayonnaise
Two big handfuls of cilantro
1 jalapeno, sliced
Fried egg (optional)
In a medium bowl, mix together all the ingredients for the marinade. Add the pork, toss it so it's coated well, and let it marinade for 30 minutes.
While the pork is marinating, julienne the carrots and daikon.

Instead of traditionally pickling these vegetables, I just squeezed the juice of 1 lime over them, dusted them with a pinch of salt, and let them sit while I prepared the rest of the ingredients. The lime juice brings a nice brightness to the sandwich.
Preheat a grill (or grill pan if you, like me, lack a space for outdoor grilling) to medium-high heat. Grill the pork, turning it once, about 4-5 minutes until it reaches 140 degrees. Let it rest, and then thinly slice it.
Now the fun part! To start assembling the sandwiches, cut the baguette into 4 sections and split each one lengthwise. For the sauce, combine the Sriracha with the mayonnaise and spread it evenly on the baguettes. Pile on the carrots, daikon, cilantro, pork, and jalapeno. I topped mine with a fried egg because why not?! You certainly don't have to, but I highly recommend it.

Finally, this is Poppy's latest perch: the box our wedding invitations came in. There's nothing like a comfy cardboard box to nap on, right?!

Tuesday, April 30, 2013
Claremont Canyon Hike
Gabe and I went on one of our favorite hikes last weekend, up in the Berkeley Hills. In retrospect, hiking up super steep hills in 80 degree weather wasn't the best choice, but the view once we reached the top was well worth it! If you're ever in the area and are up for the challenge, I highly recommend it. Or you can just look at these pictures and pretend you're there...


Hummingbird!


Neon moss

Love my neighborhood!
Subscribe to:
Posts (Atom)